Monday, May 30, 2011

Power problem solved

At the last autocross, I was very disappointed with the power of the car. The dyno said 290 hp and 288 ft/lbs but my butt dyno said it was a lot less than that. I even called the dyno guy and questioned the accuracy of the equipment. Well, anybody familiar with Stromberg or SU carbs will look at the pictures below and know immediately what the problem was-a torn diaphram. The diaphram raises and lowers a sleeve inside the carb, allowing more or less air in. This diaphram was ripped and so the sleeve wouldn't allow any more than a trickle of air into the 3 cylinders fed by this carb.


I also discovered a big ignition timing problem. I had purchased a new cap and rotor from a "Top Seller" on E-Bay and I should have known the quality of the parts was poor when the rotor just snapped in half when I tried to install it. Well, the cap recently failed as well so I went back to the original Lucas distributor cap. I'm guessing that the knock-off cap and factory cap didn't share the exact orientation on the distributor because the timing was suddenly 20 degrees too advanced. This now makes me question the quality of the thermostats I purchased from the same seller because even with the oil cooler hooked up, the coolant temperature is too high.

Autocross event #2

Things went well for the second event. The didn't leak any oil or coolant, had slightly more power than last time and behaved better under braking. It did land up running too hot by my fourth run and stalled under braking but I'll get an oil cooler on it this week and hopefully that clears up. I definitely need to find more horsepower and improve the downshifting before I will be fighting for fastest time of the day. The video camera in the first 4 videos shakes pretty badly because it's attached to a polycarbonate windshield, and I forgot to attach a microphone again-oops! The last video is with a different camera and is much better quality.

First run-sorry about the poor quality

Second run-my quickest but I clipped a cone

Third run-clean but a second slower

Fourth run-was going very well until the car stalled under braking

Third run with much better video quality

Saturday, May 28, 2011

Undertray

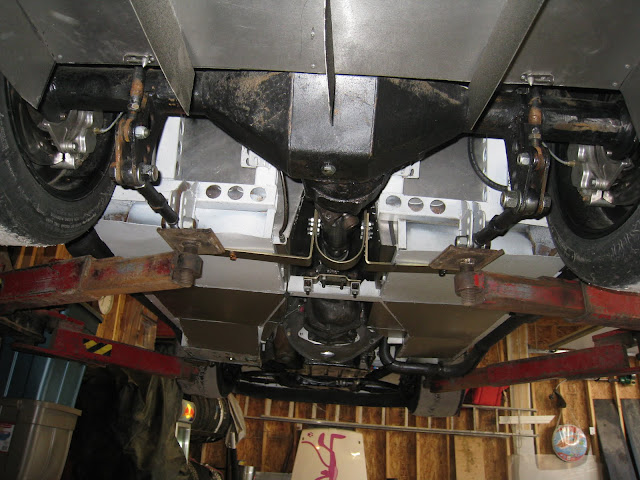
Here you can see a large gap between the floor and the diffuser. I was concerned about the diffuser acting like an air brake and needed to fill the gap.

And looking at it from the back of the car. I made a template out of poster board and cut the flat undertray out of 22 gauge aluminum.

And here it is in place. I would probably benefit from a piece to cover the driveshaft tunnel but that will have to wait for another day.

Friday, May 27, 2011

Testing the improvements

I had a very bumpy abandoned runway to test out my changes the other day. The new front sway bar and changes to the rear motion ratio seem to have done exactly what was expected-there is much less body roll and quicker reacting handling but it's also less forgiving. I went from full soft to full hard on high speed compression and the car felt most controlled somewhere in the middle. I tried stiffening low speed compression on the back only and the car went from planted to tail happy pretty quickly. Full stiff on the rebound seemed to reduce traction but adjusting to the middle felt right. I suspect the whole set-up is just a little too stiff for the very bumpy surface but I'm pretty optimistic for Nationals. I am concerned about the lack of traction off the line and under hard braking. The car has 93% anti-squat and I can raise or lower that with an adjustment of the top bars on the 4 link, I think I want to try lowering the AS number to improve braking performance. I also have an oil leak and the back of the rear spoiler and expansion chamber of the diffuser seem to have sucked up every drop of it-a good sign that the aero is working, I think. And it looks like I will have to vacuum out the interior of the car after every event because it fills up with small rocks kicked up by the slicks. Here are a couple of short videos, pardon the audio, I forgot to plug in a mic:
acceleration test  http://www.youtube.com/watch?v=9Yqpc0-8k8U
slalom test  http://www.youtube.com/watch?v=SZPos62DFw0

Saturday, May 21, 2011

Oil Cooler

I may need an oil cooler but don't want to run one if I don't have to because of the extra weight right on the nose of the car. I bought a stock XK12 oil cooler off e-bay and it just happens to be the same width as the radiator I have in the car. The problem is that I have no place to mount the cooler. I have the space in front of the rad, just nothing to attach it to. I decided to build some prototype pieces that will clamp to the radiator side tanks and once the concept is proven, I can get lighter ones made from aluminum.
The front side of the U shaped clamp with the oil cooler bolted on

The back side of the clamp with a bolt to tighten it and a piece of scrap aluminum to spread the load across the radiator

Here is a shot of the whole oil cooler in front of the radiator

And it's right behind the lower opening in the spoiler for maximum airflow

Wednesday, May 18, 2011

Front Sway Bar

As great as the car felt last weekend, looking at pictures of it on course showed me that the Pink Panther suffers from a little too much body roll. I did not have a front sway bar so I decided to mount one.
Here is the stock MGB-GT front sway bar, which happens to be correct for the car

The ends use a rubber bushing but they are too soft for this application

So I pressed them out

And pressed in an aluminum replacement

For the mounts I picked up some .75" x 1.25" aluminum and cut it 3" long

Then drilled holes to bolt to the car and one that is .625"-the same size as the sway bar

Then I sliced it across to make two halves that clamp over the bar

I still need a place to bolt the mounts so I also picked up this aluminum angle and cut it into 3" pieces

Here is the mount bolted to the angle. Notice I stamped a 1 into the mount, this is to ensure I don't mix up any of the pieces

And here is the bar bolted to the mounts


There are thin washers between the two halves to provide the right amount of tension on the sway bar

And the end links are just .75" square tube with a right hand and left hand nut welded on the ends, and the appropriate Heim joints. The piece attached to the lower heim joint attaches to the lower wishbone on the front suspension.


Installed on the car

Tuesday, May 17, 2011

Timing marks

Doing proper ignition timing has always been an issue because the plate with the timing marks appeared to be missing. But while I was replacing the oil pan gasket, I found the plate at the very bottom of the engine, where it is doing me no good at all.

Here is the plate all by itself and it has slotted holes so it may or may not be accurate

I used a dial indicator on cylinder #1 to find true top dead centre

Then bent a piece of hanger wire and bolted it to the water pump housing. Then cut a notch into the pulley and marked it with white paint. Now I can get out the timing light and properly time the engine.

Monday, May 16, 2011

Leaky coolant sensor fix

During the first big race, a coolant sensor on the water pump sprung a big leak. I pulled it off and discovered that somebody had tried to fix it with silicone and safety wire.

I removed the sensor and was left with a nice flat area for bolting a plate

I drilled and tapped 3 holes

Then bolted on an aluminum block off plate

Saturday, May 14, 2011

First Autocross

Well, I think the Pink Panther performed better than expected. The handling is awesome although the amount of engine braking when you chop the throttle is startling, the rear tires just stop moving as quick as the car. I didnt find the unassisted steering difficult but Briget did. The power was way down and we think it is fuel pressure related. The regulator would not hold a steady 3 psi, it would fluctuate between 0 and 7 psi. Then it developed a previously unknown coolant and oil leak and that's why we only did two runs each. Another weird thing was after a couple of runs, the engine would stall when we hit the brakes, even with the clutch pushed in. Perhaps related to the fuel pressure problem. But , as I said, it handles far, far better than expected so it's going to be awesome when I sort the engine out. Here is the video:  http://www.youtube.com/watch?v=_g1JsBUA32o

Monday, May 9, 2011

Corner weight and alignment

It was time for a final balance and alignment so I brought the car home, where I have a laser alignment machine I picked up for a few hundred bucks from a garage that was upgrading. But first I needed to corner balance the car and for that I borrowed my car club digital scales. I took 170 lbs of ballast and added it to the drivers seat to simulate my weight. I followed the advice in this Grassroots Motorsports Article: http://grassrootsmotorsports.com/articles/understanding-corner-weights/

I inflated the tires to 30 psi to because an under or over inflated tire will alter the results. The sway bar can throw off your results as well so it needs to be disconnected.

I put the car on the scales and bounced it up and down to get the suspension settled. The scales have a cross weight function and all I had to do was adjust the left rear and right front pushrods to get the perfect 50% crossweight.

Here is a pic of the scales display. The bottom right number is the percentage of crossweight, a perfect 50%. Also note the individual weights of the 4 corners. I'll save you from getting out the calculator, the total weight is 2353 lbs and the front/rear weight balance is 53%/47% including 170 lb driver.

Then I attached the laser alignment heads to the 4 wheels. The heads have a runout function where you rotate the wheels so the heads can work out if your wheels are bent or the clamps are not perfectly centered.

Yup, it's old and beat up but I had it calibrated and it's accurate.


The car is so easy to align. I just had to add a couple of shims on the top A-arms to get -2 degrees camber then spin the tie rods to adjust toe. Also, it's amazing how close I got the rear axle centered using only a measuring tape. All I had to do was rotate the passenger side bars half a turn each to square the diff. The final alignment numbers are -2.17 camber and .14" total toe out in the front and zero camber and toe in the back.

Thursday, May 5, 2011

Dyno session number 2

The only change I made to the engine was the new intake manifolds. The car made 30 more horsepower than before, so I'm pretty happy. I advanced the timing as far as I could and ultimately the car made 290 hp at 6023 rpm and 288.5 ft/lbs at 3765 rpm. The hp peak is 600 rpm higher and the torque peak is 400 rpm lower than before. Here is the video: http://www.youtube.com/watch?v=ffuksaN2LDI

Tuesday, May 3, 2011

Graphics

We tossed around many ideas for graphics and wanted something unique and tied into the Britishness of the car or the Jaguar V12. Briget sketched out the leaping Jaguar on the side of the car and it occured to her that the Jaguar is also called a Panther, and it wasn't a big leap to "Pink Panther" so here is the graphics of the car. There are a few details missing but you get the idea.


Monday, May 2, 2011

Shifter boots

Because of the unique shifter mechanism in the car, I need two shifter boots. I ordered some universal Mr.Gasket boots from http://www.fasttoys.net/ and today installed them.
I started by removing the linkage and holding the boot over the hole to figure out where to drill the holes.

Once the holes were drilled, I used threaded inserts so I could bolt the boots in

And both boots are installed and IMO looking good